The icicle lights we have are LEDs which is nice because they use incredibly little power and should last a long time, but has the drawback that they’re slightly harder to diagnose when they misbehave.
Once I was recovered from my various maladies I pulled out the 10 strands we have to get them up on the house (starting last weekend). One of the strands wouldn’t light so I got to play the fun game of tracking down the problem.
So I started with the obvious of checking to make sure no “bulbs” (I’ll say “bulb” because it conveys my meaning even though there are no actual bulbs) were missing. And I tested the other end of the strand and was getting a solid 120V connection, so I knew the wiring was still good.
[Edit: Individual bulbs can fail like normal and have a shunt which will allow the rest of the strand to stay lit. These bulbs are easy to find and replace (they’re the only bulb unlit). The problem I explore in this post is a bulb where the leads are broken so the power didn’t make it to the shunt in the first place.]
But once you have to go beyond those steps some of the common troubleshooting techniques won’t work on LED strands. I started with my multimeter that contains an inductive AC voltage detector (“no-touch”). Since the bad bulb breaks the circuit, traditionally you can use a voltage detector to find where the circuit breaks.
Unfortunately, for whatever reason, my multimeter was detecting voltage everywhere along the strand and along each “icicle.” So that did me no good, I’m not entirely sure why. So then you can take the obvious approach of just switching out bulbs with replacements, but the trouble is, you might have more than one bad bulb. In which case, you won’t know if you’re replacing a good bulb or a bad bulb.
Instead you need to be able to test each bulb individually to know whether it is good or not. The usual approach is a simple continuity tester (check whether a circuit exists from one lead on the bulb to the other). But, a continuity test won’t work because there is no simple circuit to test. Unless you actually cause the LED to activate (with enough voltage) you won’t have a circuit. A continuity test only uses a very low voltage and so it will report an open circuit (bad bulb). So, despite having a multimeter and knowing how to use it, it did me no good in finding the bad bulb.
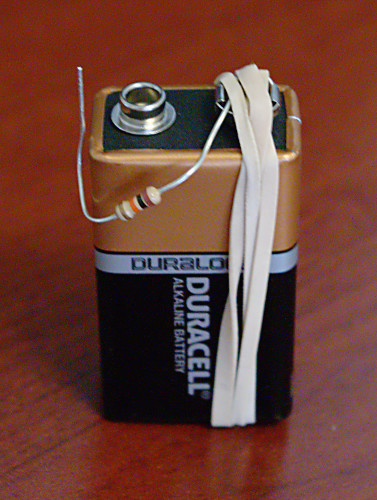
Instead you need an LED tester. You can make a simple LED tester using the following: a 9-volt battery, a resistor, and a rubber band.
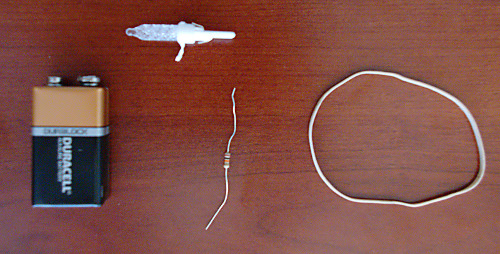
Without the resistor the only thing you’ll learn is that the LED used to work because you’ll blow out the LED from too high of voltage (which I did twice before finally digging one out). The resistor I used happened to be 10,000 ohms, but 1,000 ohms should be fine too.
Just use the rubber band to hold the resistor to the negative terminal on the battery (the negative terminal is easier to wrap the rubber band around, otherwise it really doesn’t matter). Then bend the end of the resistor around next to the positive terminal of the battery so you can easily touch the leads of a bulb to the resistor and the positive terminal.
 If you touch the LED leads backwards nothing will happen (LEDs are one way only). It won’t damage the LED, but it won’t light up either. Because of this your bulb should be keyed to only fit in its socket one way. Pay attention to that keying so that you can reliably test the correct orientation and save some time.
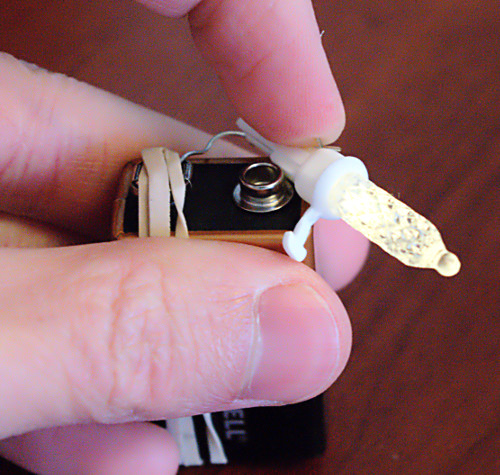 So with my makeshift tester I started popping out bulbs and testing them (the edge of a dinner knife worked great for popping the bulbs out of their base). I was actually getting pretty quick at it and it was the 21st bulb I pulled that was bad. Popped in a replacement and everything was working.
Okay, not a particularly fascinating story, but when I was searching the Internet for how to track down a bad LED in a strand of Christmas lights I wasn’t finding much useful information (just lots of information about incandescent lights sometimes with a disclaimer that it wouldn’t work for LED strands).
(And in case anyone cares, these are 70-LED icicle strands in “warm white” made by Vickerman.)
Sounds like we better stick to the old’-fashioned kind. Dad has been wanting to get LEDs so he can string them all together and only need one extension cord, but this sounds like a pain and they’re too expensive to just throw out and get new ones like you can with the incandescents (even tho’ Dad always repairs them)
Wait, new blog address?
I’m working on putting my personal/family sites under a common domain name (serindu.com). So I set the blog to live at the new address, but it should still work the same. When I set up a family “cloud” it will live at cloud.serindu.com.
I used a 470 ohm resistor because all I had were 470, 300, and 100’s. Worked just fine.
Hi. Just wondering where you got the resister? Thanks. Anne
I happened to have some kicking around. You should be able to buy a cheap pack of assorted resistors on Amazon and then look up how to identify which ones are 1,000 or 10,000 ohms.
Awesome post. Almost 9 years later and yours is the only hit I got about how to actually test an LED string.
Used your idea to test a string of bulbs which had 5-6 bad bulbs with broken wires. Still don’t get why both the continuity and voltage test fine from end to end AND replacing bulbs fixes the issue.
Had a hard time getting the bulb to touch the battery and the resistor wire together so I used a 4,700 resistor together with a 10 resistor, using the original plastic cap on the 9-volt to hold them in place, along with two rubber bands. Touching the two resistor wires to the bulbs made it easier for me.
Would I be able to use a 15k ohm resistor?
It won’t hurt anything to try, but I can’t say for sure it will work. Worst case is the resistance is too high and too much of the voltage drops over the resistor and not enough is left to get the diode to light up. So test with a known good light to tell if it’s working.
Thank you. This was the most helpful solution to the LED testing info I could find. It’s tedious but instant confirmation your bulb is ok.