Celery & Redis countdown/eta oddities

March 9, 2023 10:13 am

One of my projects at work uses the Python package Celery with Redis to manage executing background tasks. And we ran into some odd behavior that we didn’t see explained anywhere else, so I figure I’ll capture it here for the next poor soul running into these issues.

First, if you care about this subject, you should read this post over at Instawork which is a good discussion of the risks involved in using countdown and eta. It helps set the stage.

Setup

We’re using Celery with a Redis broker as part of a Django application. We apply one of 3 priorities to each of our tasks: Low, Medium, and High. High-priority tasks represent things that a human user is waiting on and need to be completed as soon as possible. Low-priority tasks are things that need to happen eventually, but we don’t really care when. And anything else gets configured as medium priority.

This set up worked in our validation testing. We saw the queues get loaded up in Redis and the workers execute tasks in priority order as expected.

The Wrong Queue

After a large-scale data-processing task we noticed that high-priority user tasks were not executing.

When I inspected the queues in Redis I found that the high-priority queue was full of low-priority tasks. So the workers were extremely busy (correctly) processing the queue, but the tasks they were running were low priority. And the human’s task was stuck behind them all.

How did this happen?

Countdown/ETA Reservations

The first part of the puzzle is how Celery handles countdown / eta tasks. countdown allows you to say “execute the task 5 minutes from now” while eta allows you to say “execute the task no earlier than March 10, 2023 at 10:08AM.”

countdown is purely syntactic sugar for eta so that you don’t have to calculate actual times yourself, so when you call apply_async with a countdown parameter Celery converts it to an eta parameter. Since internally Celery only concerns itself with eta values we’ll only talk in terms of eta from this point on.

When an eta task is generated it gets put into the appropriate priority queue. But, it doesn’t stay in the queue until its eta passes. Instead, any worker checking the queue will reserve the task immediately and hold it internally until the eta passes.

During my investigation, while the workers were idle, I scheduled a few hundred tasks with an eta and, as a result of the above behavior, the priority queues in Redis were empty. Workers will continue reserving eta tasks from queues until they have a task that needs to actually execute now. Once the workers are busy, eta tasks will stay in their appropriate queues until a worker is freed up and comes looking again.

Processing Reserved Tasks

Alright, so our workers have reserved all of our eta tasks with varying priorities and now the tasks are starting to pass their etas and need to be executed. At this point the worker completely ignores the priorities on the tasks. It begins executing whichever reserved task it happens upon first in its internal data structure (this is probably an internal queue, but I don’t know for sure).

So once a worker reserves a task its priority is no longer respected. If you schedule a few hundred eta tasks with mixed priorities (as I did) you see them executed in what appears to be an arbitrary order (I suspect they’re actually executed in order they were reserved, but I haven’t verified that because it’s not relevant to my concerns).

This is not good and reason enough to avoid using eta tasks for anything but high-priority tasks. But, it doesn’t explain how we ended up with low-priority tasks in our high-priority queue in Redis.

Death of a Celery Worker

We have Celery configured to replace each worker after completing 10 tasks. This was an attempt to work around an issue where workers would stop pulling tasks from the queue and everything would stall out. We had a hypothesis that the issue was unclosed connections to Redis and so replacing the workers would force unclosed connections to get cleaned up. We haven’t yet verified what was actually happening or if replacing the workers fixed anything though. It’s a very intermittent problem and we haven’t identified a sure trigger. (Though we did solidly identify that if Redis isn’t ready to serve connection when Celery starts then Celery will not reconnect properly and workers will only execute a single task before hanging forever.)

Anyway, the point is that we replace our workers every so often. Well, what happens to all those eta tasks the worker had reserved? They go back in the queue so another worker can get them. But, they all go into the default queue instead of going back to their appropriate priority queues. It happens that the default queue is the high-priority queue. So each time a worker was getting cycled, all the eta tasks it held were pushed into the high-priority queue.

The perfect storm

So here’s the scenario. Our workers are sitting idle waiting for work to do. Our large-scale data-processing task schedules a bunch of low-priority jobs with an eta. The workers eagerly snap up all these tasks and reserve them for future execution. As soon as the earliest etas pass each worker begins executing and stops reserving more eta tasks from the low-priority queue.

Each worker completes 10 tasks and gets replaced. As each worker is replaced it returns the remainder of its eagerly-reserved eta tasks to the high-priority queue. The new workers being spawned now begin processing the high-priority queue since it’s full of tasks.

A user comes along and engages in an action backed by a high-priority task. But the user’s high-priority task is now stuck behind several thousand low-priority tasks that have been misplaced in the high-priority queue.

Moral of the story

We had run across the countdown parameter to apply_async and thought it would be a good way to avoid some unnecessary work by pairing some high-churn jobs with a flag so they’d only be scheduled again if they weren’t already scheduled (this flag was managed outside of the Celery world).

We will be rolling back that change so as to avoid this situation in the future.
Home Board

March 11, 2018 7:19 pm

Okay, “Home Board” is a dumb name, but I don’t know what else to call it.  Now that we have that out of the way, let’s talk about this cool thing I built.

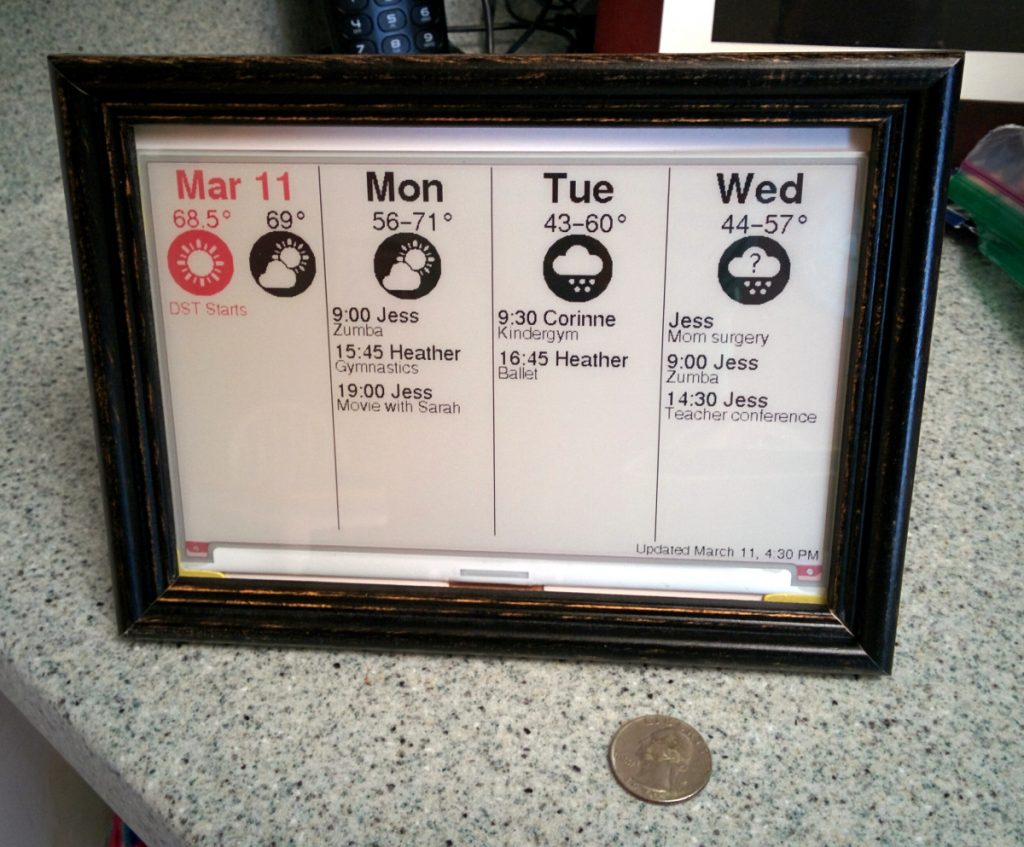
This is a 7.5″ e-ink display mounted inside a picture frame.  It’s hooked up to a Raspberry Pi and updates the weather and calendar information every 15 minutes.  During “special events” it displays an additional celebration message (see example below).

This is a product I’ve wanted for a long time, but no one made such a thing as far as I could find.  So I finally decided to make it myself.

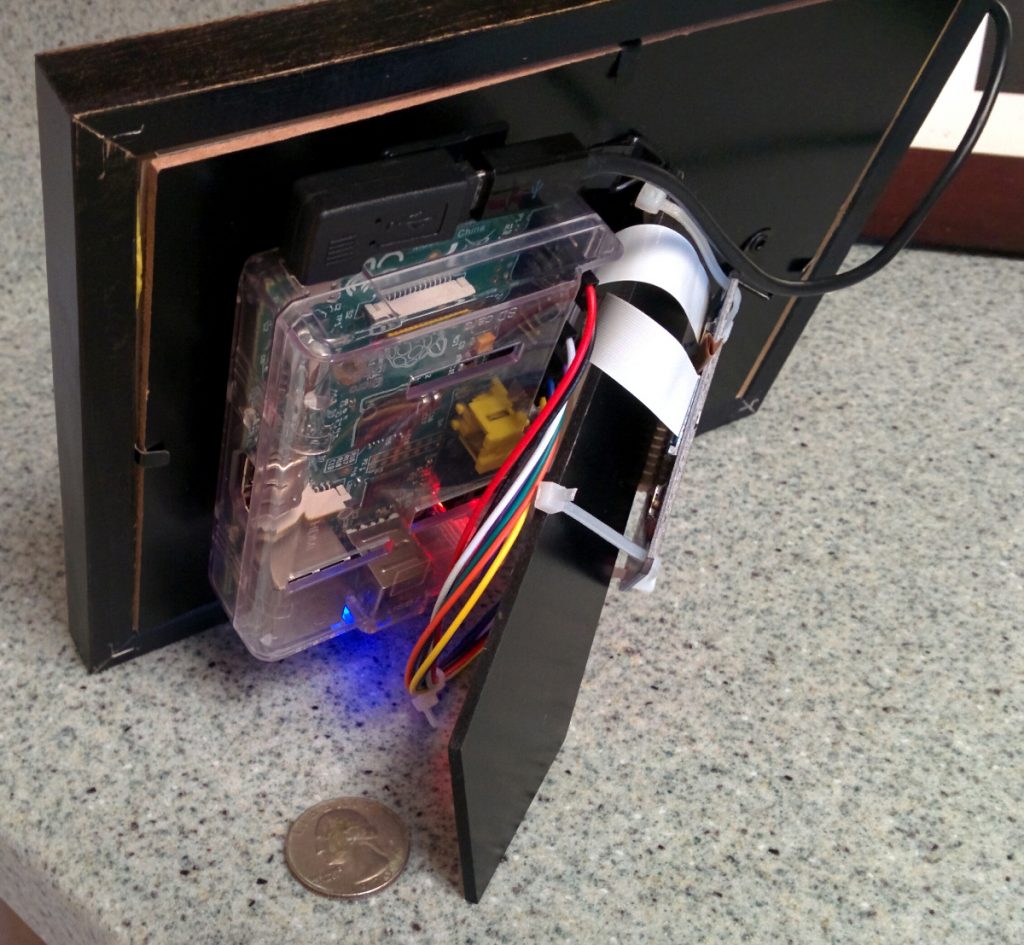
As you can see, the back is a bit of a mess; but it’s all attached, so you only have to run the power cord.

It would be cleaner if I were using a newer Raspberry Pi. The display comes with a “hat” (zip-tied to the frame stand in this picture) that fits directly on the GPIO pins of the newer Raspberry Pi.  It doesn’t fit on the version 1 (which I’m using here), so I had to use the provided multi-colored wires and connect the pins myself.

Also, the newer RPis use microSD cards that don’t hang over the edge of the case (behind the power connectors).  And they have built-in Wi-Fi so there’d be no additional dongle (the blue glow at the bottom).

The 7.5″ screen was the largest e-ink display I could find.  Someone used to make a 10.2″ one, but it appears to be discontinued.  The refresh rate is terrible (about 15 seconds to change images, with lots of flashing throughout).  But for my purposes that’s fine.  I’m only updating it every 15 minutes.

Here’s a sample image of a birthday display:

I wanted a e-ink display for 2 reasons.  The first is that it doesn’t glow, so being on all night isn’t annoying. And the second is that it’s super low power.  Power is only needed while updating the display.  It pulls its power from the Raspberry Pi, which, at full draw, maxes out at ~2 watts.  Which means, assuming some loss in the power adapter, is less than $5 a year (I’m pretty sure I did that math right).

It’s awesome.

Parts

  1. Waveshare 7.5 inch e-ink 3-color display with Raspberry Pi connector.
  2. Raspberry Pi with case and power supply (I’m using a version 1, but the display works with 1, 2, or 3).
  3. 5×7″ Picture frame
  4. Some miscellaneous mounting hardware to attach Pi to back of frame

The total cost of hardware is about $125 (display, RPi, SD card, case, power supply, cord, frame, mounting hardware).

Software

  1. Weather Underground API (low-volume developer key is free)
  2. Google Calendar Python API
  3. Waveshare driver to interact with the display (included in my code, below)
  4. My custom written Python application that pulls the data together, generates the image, and sends it to the display.

The Weather in our Kingdom

June 17, 2017 9:50 pm

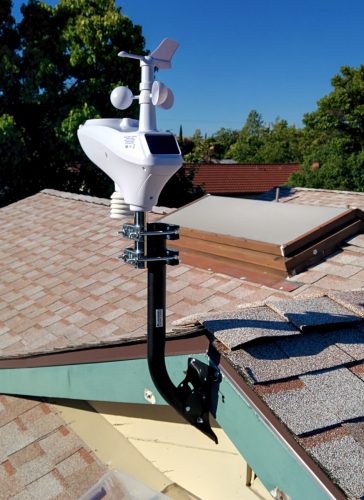
Jess got me a weather station for my birthday which is now installed up on the roof:

The unit is an Ambient Weather WS-1400-IP.  It reports temperature, humidity, wind speed, wind direction, rainfall, solar radiation, etc.  It comes with an indoor unit that also reports inside temperature and humidity.

The data is sent to wunderground.com and you can find it here: https://www.wunderground.com/personal-weather-station/dashboard?ID=KCALIVER107

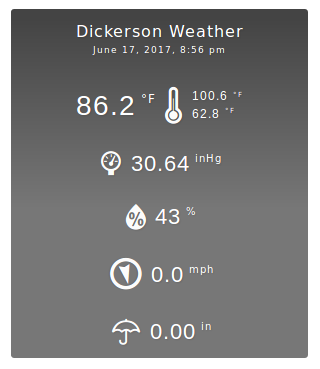
But, wunderground can be a little flaky, so I’m also capturing the data into my own database and serving it up.  On the sidebar of the blog you can find a widget that looks like this:

I’m using the “Weather Station” WordPress plugin to read a Cumulus-style file.  Now, the Ambient Weather ObserverIP unit does not produce the Cumulus “Realtime.txt” file that the WordPress plugin needs.  But, I have programming super powers.  So I wrote a shim that scrapes the data from the ObserverIP web interface and writes out a “Realtime.txt” file that I serve up for the WordPress plugin.

I also write out a human-readable page with the weather data on it you can see here: http://weather.serindu.com/

It’s not very pretty right now, but it’s up and running, updating every 5 minutes.  I’ll get around to improve the aesthetics at some point.

Having the indoor and outdoor sensors I’m thinking I’ll have to write up something that will notify me when the temperatures outside and inside cross so I’m alerted to open or close the windows as appropriate.  But I haven’t got that far yet.

The shim I wrote to put all these pieces together is available on GitHub: https://github.com/kdickerson/weather

It’s just a Python script set to run every 5 minutes via Cron.  It scrapes the data off the ObserverIP unit, formats it and inserts it into the SQLite database, computes daily high/low values from the stored data, and writes Realtime.txt and index.html into a folder being served by Apache.

PaperTrust

October 5, 2011 7:10 pm

So, a while back I blogged an idea I had about cryptographically signing various documents.  I specifically talked about checks, but you can apply the principle anytime you have a fairly small amount of data which is supposed to be issued from a trusted source: cashier’s checks, money orders, driver’s licenses, event tickets, passports, boarding passes, etc.

Well, I spent some time playing around and put together a working example.  It’s not fancy, but it does the job.  It’s been a few months, but it really didn’t take that long.  Especially since I had to do some reading about QR codes and using them, along with public-key cryptography, from Python.  So I had a basic prototype done in about a week.  Then back in August I decided to flesh things out a bit more and produce a nice demo application.  I’m calling the system “PaperTrust” as it allows you to embed the trust element onto the paper item.

Here’s a video demonstration:

Text description of the demo:
So, in my demo, we generate data for a cashier’s check and then sign it using the demo private key.  We stick the signed data (which includes a signing-organization ID) and the signature into a QR code and stick that onto the check and print it.  Now the check is physical and can be carried around as usual.

Now say you’re going to use this check to pay for something from a stranger.  This stranger needs to know they can trust the check.  So they use their verifier application to scan the QR code from your check.  It reads the organization ID, looks up the correct public key for that organization, and verifies that the signature is valid.  It also displays the signed data so the person can compare it to what’s physically printed on the check.  This is a cryptographically secure guarantee that the check is valid (or at worst an exact copy of a real check, which should make tracking down counterfeiters a lot easier).  So you would use this in tandem with traditional anti-forgery measures like watermarks, micro-print, thermal ink, etc.

I’ve put the code up on GitHub: PaperTrust on GitHub.

Django – Cronjobs Made Easy!

August 8, 2009 3:04 pm

For those that have no interest in reading about my nerd-ventures, you can stop reading this post now.

If you’re still reading, don’t say I didn’t warn you.

As has been mentioned previously (mainly on my previous blog), I’ve been doing a fair bit of side project work using the Django Framework. Sadly, the out-of-the-box Django doesn’t provide a solution for running cronjobs (for tasks that need to be run within the Django environment).

Since that’s a fairly common requirement I didn’t think it was going to be a big deal, but there wasn’t a really solid solution out there. There are a few different attempts, but they each have some limitation. There’s django-cron but that just skips over the native cron entirely, which I felt was a bit extreme. Cron can already do a good job of waking up and running a command, so duplicating that functionality doesn’t seem necessary. It also self-declares that it is designed for frequent tasks (hourly or more frequently), which doesn’t work for me. Tasks on the Board need to be able to run from a minute scale to a daily scale and beyond.

Then I found this guy’s method, which works, but I’d like a little more integration. That way when developing apps the “go add cron job” isn’t a separate step. I want the job information to right in with the rest of my app information. That way I can see what should be happening and when.

That’s when I came across Django-Chronograph. This solution was 95% of what I wanted. It provides a nice interface to the system to monitor your jobs and view logs. It requires only a single crontab entry. It uses the iCalendar style of task declaration so you have total control of when your jobs run. However, it is limited to running commands through the Django Management system. I wanted something a little more programmatic. Such that I could just point at whatever function I wanted for my jobs.

So I took Django-Chronograph and started my modifications. The result is Django Cron Manager. Setup is very similar to using the Admin system. You call the cron_manager.autodiscover() function from your urls.py file. This goes out and inspect your installed apps and registers any Cron Jobs they declare. Then, using the guts of Django-Chronograph, it keeps track of these jobs in the database and monitors when they need to run.

I’m planning on posting all the code with an example at some point, but I’m going to try to get in touch with Weston (the guy who wrote Django-Chronograph) to see if he just wants to roll my changes into his system permanently. If you stumble upon this post and the changes aren’t in Django-Chronograph, and I haven’t provided any further information. Just leave a comment that you’re interested in the code with a way to contact you and I’ll get something to you.

*** Update ***
I’ve posted the code here: http://code.google.com/p/django-chronograph/issues/detail?id=15