Django in FIPS mode

November 12, 2019 11:28 am

Django today (2.2+) still uses the MD5 hash function to generate cache keys and database object names. They’re not security related, so that’s fine. But if you’re running on a FIPS-compliant system then MD5 is disabled and Django blows up.

Red Hat Enterprise Linux provides a patched version of Python which allows you to pass a keyword argument to md5, “usedforsecurity”. If you set that to False the system will allow your call to MD5 to go through.

This extension is being merged upstream so everyone will have it, it’s targeted for Python 3.9: https://github.com/python/cpython/pull/16044. Once that work is complete, Django will update their code to pass the parameter natively and none of this will be necessary: https://code.djangoproject.com/ticket/28401. But until then….

So, RHEL has a supported method to tell the system that you’re using MD5 for non-security purposes; now we need to make Django pass that parameter without forking Django. We can do this with monkey patching.

I would prefer not to use a global monkey patch. It would work, but then anything using MD5 would be allowed instead of only the things I’ve verified are non-security related. This could be a compliance issue.

Implementing a localized monkey patch isn’t too much harder once you know a little Python voodoo. We load a copy of the hashlib module and then monkey-patch the copy to pass the “usedforsecurity” parameter. Then we inject the monkey-patched version into any modules we need to replace their normal hashlib object with our copy.

import hashlib
import importlib

def _non_security_md5(*args, **kwargs):
    kwargs['usedforsecurity'] = False
    return hashlib.md5(*args, **kwargs)

def monkey_patch_md5(modules_to_patch):
    """Monkey-patch calls to MD5 that aren't used for security purposes.

    Sets RHEL's custom flag `usedforsecurity` to False allowing MD5 in FIPS mode.
    `modules_to_patch` must be an iterable of module names (strings).
    Modules must use `import hashlib` and not `from hashlib import md5`.
    """
    # Manually load a module as a unique instance
    # https://stackoverflow.com/questions/11170949/how-to-make-a-copy-of-a-python-module-at-runtime
    HASHLIB_SPEC = importlib.util.find_spec('hashlib')
    patched_hashlib = importlib.util.module_from_spec(HASHLIB_SPEC)
    HASHLIB_SPEC.loader.exec_module(patched_hashlib)

    patched_hashlib.md5 = _non_security_md5  # Monkey patch MD5

    # Inject our patched_hashlib for all requested modules
    for module_name in modules_to_patch:
        module = importlib.import_module(module_name)
        module.hashlib = patched_hashlib

When our application starts up it detects FIPS mode and runs the monkey patch:

modules_to_patch = [
    'django.contrib.staticfiles.storage',
    'django.core.cache.backends.filebased',
    'django.core.cache.utils',
    'django.db.backends.utils',
    # 'django.db.backends.sqlite3.base',  -- Only if system has sqlite installed
    'django.utils.cache',
]
try:
    import hashlib
    hashlib.md5()
except ValueError:
    monkey_patch_md5(modules_to_patch)

This lists the specific modules in Django that use MD5 for non-security purposes (determined by searching through the codebase and reading the code). Each module has its version of hashlib replaced with the monkey-patched version and Django is none the wiser.

Home Board

March 11, 2018 7:19 pm

Okay, “Home Board” is a dumb name, but I don’t know what else to call it.  Now that we have that out of the way, let’s talk about this cool thing I built.

This is a 7.5″ e-ink display mounted inside a picture frame.  It’s hooked up to a Raspberry Pi and updates the weather and calendar information every 15 minutes.  During “special events” it displays an additional celebration message (see example below).

This is a product I’ve wanted for a long time, but no one made such a thing as far as I could find.  So I finally decided to make it myself.

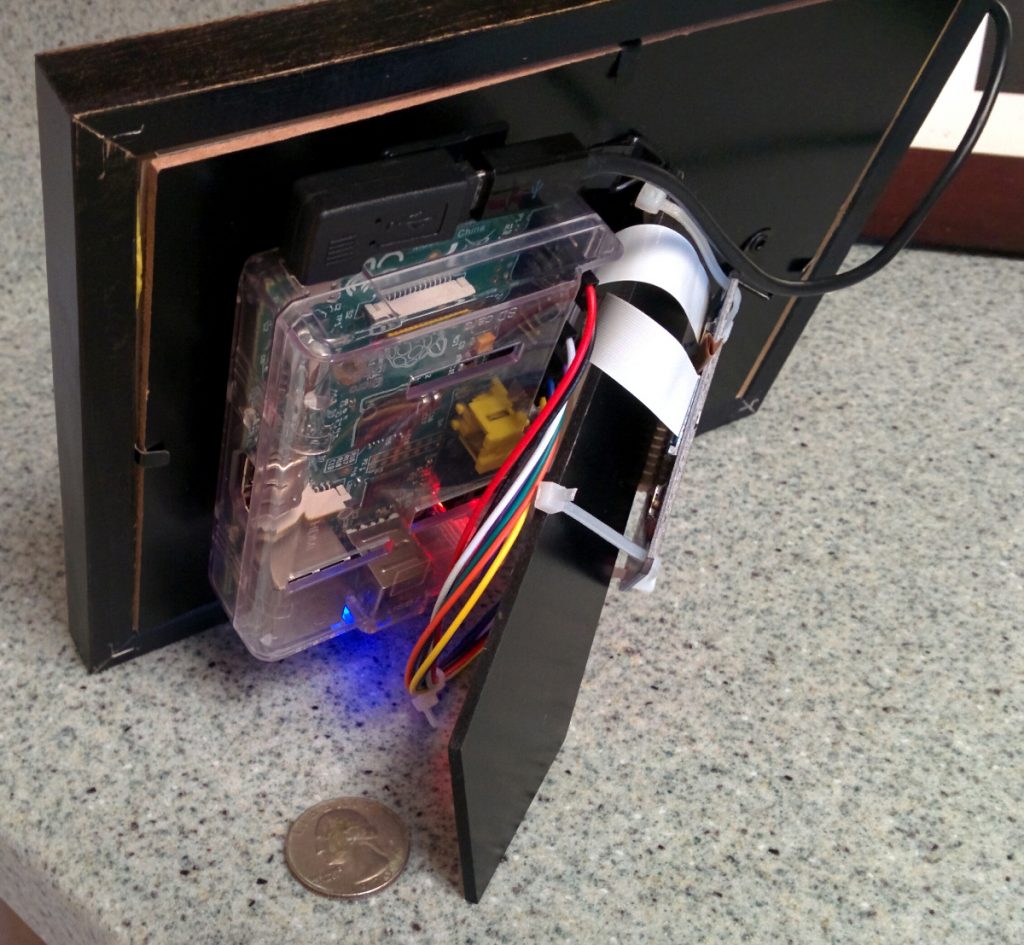
As you can see, the back is a bit of a mess; but it’s all attached, so you only have to run the power cord.

It would be cleaner if I were using a newer Raspberry Pi. The display comes with a “hat” (zip-tied to the frame stand in this picture) that fits directly on the GPIO pins of the newer Raspberry Pi.  It doesn’t fit on the version 1 (which I’m using here), so I had to use the provided multi-colored wires and connect the pins myself.

Also, the newer RPis use microSD cards that don’t hang over the edge of the case (behind the power connectors).  And they have built-in Wi-Fi so there’d be no additional dongle (the blue glow at the bottom).

The 7.5″ screen was the largest e-ink display I could find.  Someone used to make a 10.2″ one, but it appears to be discontinued.  The refresh rate is terrible (about 15 seconds to change images, with lots of flashing throughout).  But for my purposes that’s fine.  I’m only updating it every 15 minutes.

Here’s a sample image of a birthday display:

I wanted a e-ink display for 2 reasons.  The first is that it doesn’t glow, so being on all night isn’t annoying. And the second is that it’s super low power.  Power is only needed while updating the display.  It pulls its power from the Raspberry Pi, which, at full draw, maxes out at ~2 watts.  Which means, assuming some loss in the power adapter, is less than $5 a year (I’m pretty sure I did that math right).

It’s awesome.

Parts

  1. Waveshare 7.5 inch e-ink 3-color display with Raspberry Pi connector.
  2. Raspberry Pi with case and power supply (I’m using a version 1, but the display works with 1, 2, or 3).
  3. 5×7″ Picture frame
  4. Some miscellaneous mounting hardware to attach Pi to back of frame

The total cost of hardware is about $125 (display, RPi, SD card, case, power supply, cord, frame, mounting hardware).

Software

  1. Weather Underground API (low-volume developer key is free)
  2. Google Calendar Python API
  3. Waveshare driver to interact with the display (included in my code, below)
  4. My custom written Python application that pulls the data together, generates the image, and sends it to the display.

Understanding Meltdown

January 12, 2018 1:43 pm

I’ve been trying to understand the Meltdown vulnerability that’s been in the news lately (a vulnerability in Intel’s CPU design allowing an attacker to obtain access to any data in memory on the system).  I understand it at a high level, but every time I’ve tried to dive into the details to understand an example it falls apart on me.  So I’m going to write this to force myself to fully dissect the parts I’m missing and maybe help someone else in the same boat.

This is not a post intended for a general audience.  I don’t expect it will be meaningful or useful to anyone that doesn’t already understand programming to some degree.

Eben Upton has a great write up over at RaspberryPi.org which will be the basis of my post.  I’m not going to recreate his work, but instead I’m going to dive into greater detail starting at “Putting it all together”.

We start with his pseudocode:

t = a+b
u = t+c
v = u+d
if v:
   w = kern_mem[address]   # if we get here, fault
   x = w & 0b100           # * Modified, See Note
   y = user_mem[x]
* Modification Note:
The original was "x = w&0x100" which I've replaced with "x = w & 0b100".  0x100 is hexadecimal shorthand for the binary 000100000000.  I'm going to use an 8-bit example, so I'm replacing it with 0x4, since my example will only use binary I rewrote it to 0b100.  It is irrelevant to the method of the attack, only changed for convenience.

For those of us that spend our time on higher-level programming languages (like Java, Groovy, Python, JavaScript, etc.) the bit-twiddling needs a little more detail.  That detail is the remainder of my post.

Let’s suppose we live in a 8-bit world for this example (mainly so I don’t have to write out really long numbers that are irrelevant to the point I’m making).  In our 8-bit world each of our memory locations holds 8-bits.

Now, let’s dissect Upton’s pseudocode staring inside the “if”:

w = kern_mem[address]   # if we get here, fault

This finds the 8-bits contained at “address” in a privileged part of the memory which we shouldn’t be able to access, here called “kern_mem”.

When the CPU sees us attempt to use that data, it will stop us (i.e., “if we get here, fault”).  The crux of this vulnerability is that the CPU will fetch this information for us even though we’re not allowed to see it; later it will realize we’re not allowed to see it and stop us.  But we do something clever which lets us know what is in that memory even though we never saw it.

Those 8-bits from memory location kern_mem[address] are assigned to the variable “w”, let’s suppose those bits are 01010101.

w == 01010101 # A Number we're not allowed to see
-----
x = w & 0b100

This is a “masking” operation (think masking-tape when painting).  0b100 is the mask, which is shorthand for 00000100.  This line will “mask” out everything except 1 bit of “w”.  The result will always either be 00000000 or 00000100; note that this is either all zeroes or the same value as the mask.  Since both the mask and “w” have 1 as the 3rd bit, the resulting value, in our example, will be 00000100 and assigned to the variable “x”.

w == 01010101 # A Number we're not allowed to see
x == 00000100 # A single bit from that number
----
y = user_mem[x]

Now we’re going to get the 8-bits contained at “x” in a piece of memory we are allowed to access, here called “user_mem”.  “x” is the single bit from the-number-we-cannot-see.  In this case we’ll get the 8-bits located at user_mem[00000100] and assign those 8-bits to the variable “y”.

We don’t care at all what the 8-bits from that location in memory actually are.  The important thing is that the memory system went and got them for us from main memory and loaded them into a local cache.  This process may have taken, say, 100ns.  Next time I ask for the 8-bits in user_mem[00000100] the memory system will say “Oh, I already have that in cache, here ya go” and it will only take, say, 3ns.  Keep this in mind.

w == 01010101 # A Number we're not allowed to see
x == 00000100 # A single bit from that number
y == we_dont_care # Cached value of user_mem[00000100]

These 3 things happen before the CPU realizes we’re not allowed to see “w”.  Once it makes that realization, it undoes the work so that “w”, “x”, and “y” no longer have these values so that we can’t get to them (effectively at least).

So what good does it do us as an attacker if we can’t actually get that data in “w” that we tried to access?

The memory cache still has user_mem[00000100] loaded in to it!

After tricking the CPU into doing this work for me I attempt to access user_mem[00000100].  I know to access user_mem[00000100] because 00000100 was the mask I chose (0b100).  I don’t care at all what value is actually stored at user_mem[00000100].  I only care how long it takes to access: I note the current time, access the memory location, and then see how much time has passed.

If it takes ~3ns to access that memory, it must have been in the cache.  It would only be in the cache if “x” had been 00000100.  “x” would only have been 00000100 if the 3rd bit of “w” was 1.

I now know that “w” looks like ?????1??.  That was a lot of work for just a little bit of information (pun intended).  But CPUs are quick and this can all be happening without you being aware of it.  So, now let’s repeat the process, but this time we’ll change our mask:

w == 01010101 # A Number we're not allowed to see
-----
x = w & 0b10

The mask has been moved over one bit.  Because the 2nd bit of “w” is 0, “x” holds the 8-bits 00000000.

w == 01010101 # A Number we're not allowed to see
x == 00000000 # A single bit from that number
----
y = user_mem[x]

This time we get the 8-bits located at user_mem[00000000] loaded in to the cache.

w == 01010101 # A Number we're not allowed to see
x == 00000000 # A single bit from that number
y == we_dont_care # Cached value of user_mem[00000000]

This time the mask was 00000010, so we time how long it takes us to access user_mem[00000010].  This time it takes ~100ns, by which we determine that it must not have been in the cache.  That could only be true if “x” had been 00000000.  “x” could only have been 00000000 if the 2nd bit of “w” had been 0.

Now we know that “w” looks like ?????10?.  Keep doing this over and over again and we can read any data we like, we just have to piece it together.

Is it not a strange fate that we should suffer so much fear and doubt for so small a thing? So small a thing!

— Boromir, “The Fellowship of the Ring”

Like Sauron’s One Ring, this truly is a small thing, but will bring about much pain and anguish.

One [Flaw] to bring them all and in the darkness bind them.